Resetting your Shark robot vacuum is a simple process that can resolve many common issues. This guide provides clear, step-by-step instructions for both a soft reset and a full factory reset. Following these steps can clear error codes, restore Wi-Fi connectivity, and return your vacuum to its default settings.
Contents
- 1 Key Takeaways
- 2 Learn How to Reset Your Shark Robot Vacuum Easily
- 3 Why Would You Need to Reset Your Shark Robot Vacuum?
- 4 What You’ll Need Before You Start
- 5 Method 1: The Soft Reset (Power Cycle)
- 6 Method 2: The Full Factory Reset
- 7 Troubleshooting Your Reset
- 8 How to Prevent Future Problems
- 9 Conclusion
- 10 Author
Key Takeaways
- Understand the Reset Types: A soft reset is a quick reboot for minor glitches, while a factory reset erases all data and settings for major issues.
- Locate the Correct Buttons: Most Shark robot vacuums use a combination of the DOCK and MAX buttons, but always check your specific model’s manual.
- Follow the Step-by-Step Process: Powering down the vacuum correctly is a crucial first step before initiating any reset procedure.
- Reset to Solve Specific Problems: Use a reset to clear persistent error codes, fix unresponsive behavior, or troubleshoot Wi-Fi connectivity problems.
- Re-pair and Reconfigure After: A factory reset will require you to reconnect the vacuum to the SharkClean app and re-enter your Wi-Fi credentials.
- Perform Regular Maintenance: Prevent the need for frequent resets by regularly cleaning the sensors, brushes, and filter as recommended.
Learn How to Reset Your Shark Robot Vacuum Easily
Is your Shark robot vacuum acting up? Maybe it’s flashing an error light, won’t connect to Wi-Fi, or is just stuck in a loop. Don’t worry! Often, the simplest solution is to perform a reset. It’s like giving your vacuum a fresh start.
This guide will walk you through everything you need to know. We will cover two main types of resets: a simple soft reset and a full factory reset. You will learn when to use each method and exactly how to do it, step-by-step. Let’s get your helper back to cleaning!
Why Would You Need to Reset Your Shark Robot Vacuum?
Think of a reset as a troubleshooting powerhouse. It can solve a surprising number of issues without needing a repair service. Here are the most common reasons:
Visual guide about Learn How to Reset Your Shark Robot Vacuum Easily
Image source: sharkrobovacuum.com
- Error Codes: The vacuum is displaying a persistent error light or code (like E1, E8, etc.) that doesn’t go away after basic cleaning.
- Wi-Fi/App Issues: The vacuum won’t connect to your home Wi-Fi network or has disappeared from the SharkClean app.
- Unresponsive Behavior: The vacuum doesn’t respond to button presses, won’t start a cleaning job, or won’t return to its dock.
- Navigation Problems: It’s bumping into walls more than usual, getting lost, or having trouble mapping your home.
- Before Selling or Gifting: A factory reset erases your personal data and map history from the vacuum.
What You’ll Need Before You Start
Good news! You don’t need any special tools. Just gather these few items:

Visual guide about Learn How to Reset Your Shark Robot Vacuum Easily
Image source: robots.net
- Your Shark robot vacuum.
- Its charging dock (plugged into power).
- A small, pointed object like a paperclip or SIM ejector tool (for some models).
- Your smartphone with the SharkClean app installed (for reconnection after a factory reset).
- Your Wi-Fi network name and password.
Pro Tip: Always check your specific model’s user manual first. While most Shark robots follow similar steps, there can be slight variations. You can usually find the manual online if you’ve misplaced it.
Method 1: The Soft Reset (Power Cycle)
This is the first and easiest step. A soft reset simply reboots the vacuum’s system. It clears temporary glitches without deleting your maps or schedules. Do this for minor issues like a single failed cleaning job or a temporary error.
Visual guide about Learn How to Reset Your Shark Robot Vacuum Easily
Image source: cleanersadvisor.com
Step 1: Power Down the Vacuum
First, pick up your robot vacuum and turn it over. On the underside, you will find a power switch. Slide this switch to the “OFF” (O) position. Wait for about 10 seconds.
Step 2: Place on Dock and Power On
Now, place the vacuum back on its charging dock. Make sure the dock’s power cord is plugged into the wall. Slide the power switch on the vacuum back to the “ON” (I) position.
Step 3: Wait for Reboot
You should see the vacuum’s lights illuminate. It may beep. Leave it on the dock for a full 2-3 minutes. This allows the system to fully reboot and the battery to get a small charge.
Step 4: Test the Vacuum
After waiting, press the “CLEAN” button on the vacuum or start a job from the app. If the soft reset worked, it should start cleaning normally. If the problem continues, move on to a factory reset.
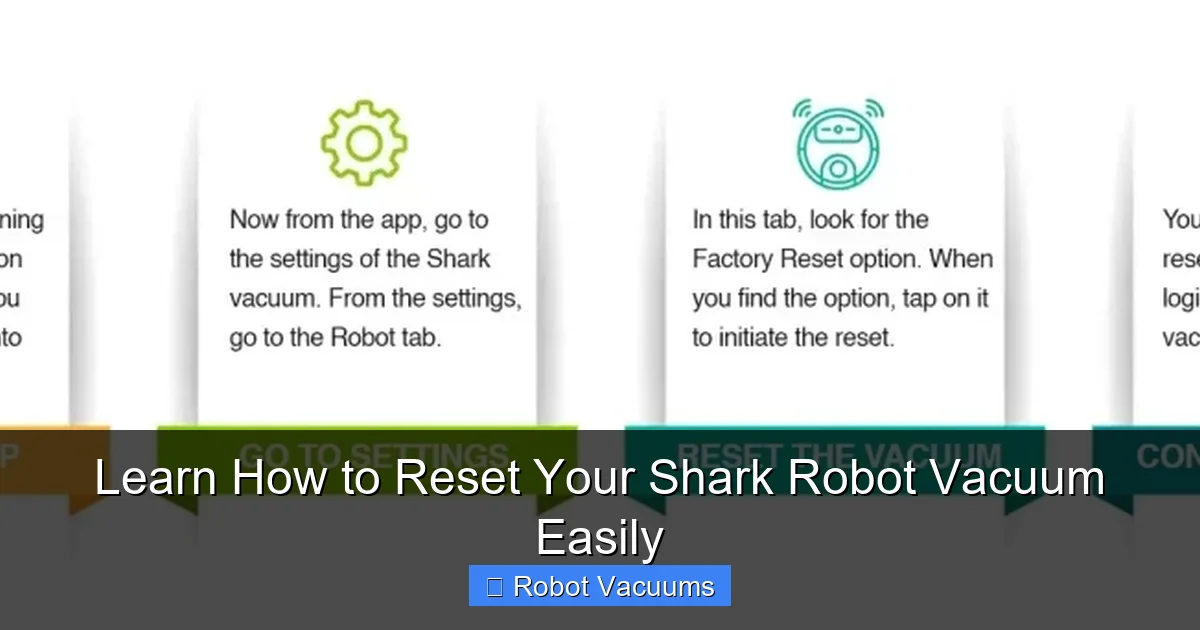
Method 2: The Full Factory Reset
A factory reset is more powerful. It returns your Shark robot vacuum to its original, out-of-the-box state. Warning: This will erase all stored data. That includes your smart maps, cleaning schedules, and Wi-Fi credentials. You will have to set it up again in the app. Use this for persistent problems a soft reset couldn’t fix.
The most common method uses the buttons on the vacuum itself. For many models (like the Shark AI Ultra, IQ, and AV series), the process is very similar.
Step 1: Initial Power Down
Start with the vacuum off its dock. Turn it over and slide the physical power switch to “OFF.” Wait 30 seconds. This ensures it’s fully powered down.
Step 2: Press and Hold the Reset Buttons
This is the key step. While the vacuum is still powered OFF and upside down, locate the DOCK and MAX buttons on the top control panel. Using two fingers, press and hold both the DOCK and MAX buttons at the same time.
Step 3: Power On While Holding
Keep holding those two buttons down! Now, with your other hand, flip the physical power switch on the underside back to the “ON” position. Continue holding the DOCK and MAX buttons for another 10-15 seconds after you turn the power on.
Step 4: Listen for the Signal
You will hear a series of beeps or tones. This is the vacuum telling you the factory reset process has started. Once you hear this, you can release the DOCK and MAX buttons.
Step 5: Wait for Completion
The vacuum may cycle its lights and make more sounds. This can take up to a minute. Do not interrupt it. When it’s finished, it will typically play a startup tone or the lights will settle into a normal pattern.
Step 6: Reconnect and Set Up
Your vacuum is now like new. Place it on the charging dock. Open the SharkClean app on your phone. You will need to add a new device and go through the setup process again, just like you did the first day you got it. This includes connecting it to your Wi-Fi network.
Troubleshooting Your Reset
What if the standard button method doesn’t work? Don’t panic. Here are some solutions.
If the Button Combo Doesn’t Work
Some older or specific models might use a different method. Look for a small pinhole labeled “Reset.” You may need to use a paperclip to press and hold the button inside for 10 seconds. Again, your model’s manual is the best resource.
After Reset, Vacuum Won’t Connect to App
This is common. First, ensure your phone is connected to your home’s 2.4 GHz Wi-Fi band (Shark robots do not support 5 GHz for setup). Second, delete the old vacuum from your app before trying to add the newly reset one. Finally, restart your phone and Wi-Fi router, then try the setup process again.
Error Code Returns After Reset
If the same error code comes back immediately after a factory reset, it likely indicates a physical problem. The reset cleared the software, but a hardware issue remains. Common culprits are a stuck wheel, a tangled brush, a clogged filter, or a dirty sensor. Give your vacuum a thorough physical cleaning. Check for blockages in the brushroll and suction path.
How to Prevent Future Problems
Regular care can reduce the need for resets. Follow this simple maintenance routine:
- Empty the Bin: After every cleaning job. A full bin strains the system.
- Clean the Filter: Tap it out weekly and rinse it (when completely dry) every month.
- Clear the Brushes: Weekly, remove the brushroll and cut away any wrapped hair or string.
- Wipe the Sensors: Use a dry microfiber cloth to gently clean the cliff sensors and navigation window.
- Check the Wheels: Make sure the side wheel and main wheels spin freely without debris.
- Keep the Dock Clear: Ensure the dock’s charging contacts and the area around it are clean and free of obstacles.
Conclusion
Learning how to reset your Shark robot vacuum is an essential skill for any owner. It’s a quick, free fix for many common frustrations. Remember, always try the gentle soft reset first. If the problem is deeper, the full factory reset is your powerful solution. Just be ready to set up your vacuum again afterward.
With the steps in this guide, you can confidently tackle error lights, app dropouts, and weird behavior. Combine this knowledge with regular maintenance, and your Shark robot vacuum will keep your floors clean for years to come. Happy cleaning!
🎥 Related Video: How To Reset Your Shark Robot Vacuum (How Do I Factory Reset My Shark Robot Vacuum?)
📺 The Savvy Professor
How To Reset Your Shark Robot Vacuum (How Do I Factory Reset My Shark Robot Vacuum?). In this video tutorial I will show you …