A toilet plunger is a simple yet indispensable tool designed specifically to clear blockages in your toilet’s drain. Unlike sink plungers, it features a tapered flange that creates a powerful seal in the toilet bowl. Knowing how to use one properly can save you from messy overflows, costly plumber visits, and major household stress.
Contents
- 1 Key Takeaways
- 2 What Is a Toilet Plunger and Why You Need One Right Now
- 3 What Exactly Is a Toilet Plunger?
- 4 Why You Absolutely Need a Toilet Plunger Right Now
- 5 Types of Toilet Plungers: Choosing Your Champion
- 6 How to Use a Toilet Plunger Correctly: A Step-by-Step Guide
- 7 Troubleshooting: When the Plunger Isn’t Enough
- 8 How to Store and Care for Your Toilet Plunger
- 9 Conclusion: Your Household’s First Responder
- 10 Author
Key Takeaways
- It’s a Specialized Tool: A toilet plunger is not the same as a sink or cup plunger. Its unique flange design is essential for creating the seal needed to dislodge toilet clogs.
- Every Home Needs One: A clogged toilet is not a matter of “if” but “when.” Having the right plunger on hand is the first and most critical line of defense against a bathroom disaster.
- Technique Matters: Proper use involves creating a tight seal and using firm, controlled thrusts, not frantic splashing. The goal is to push pressure through the clog, not just the water.
- Prevention is Key: A plunger can also be a preventive tool. A few gentle pumps after a “difficult” flush can help move potential blockages before they become serious.
- Maintenance is Simple: Rinsing and storing your plunger properly after each use prevents germ spread and ensures it’s ready for the next emergency.
- Choose the Right Model: Options range from basic rubber flange plungers to more advanced accordion or ball-and-cup designs. Your choice should balance effectiveness, storage, and ease of use.
What Is a Toilet Plunger and Why You Need One Right Now
Let’s talk about a hero that doesn’t wear a cape. It lives in the shadowy corner behind your toilet. It’s humble, often ignored, but when disaster strikes, it’s the first thing you reach for. We’re talking, of course, about the toilet plunger.
If you’ve ever faced a toilet that won’t flush, with water perilously rising toward the rim, you know the instant panic. In that moment, a toilet plunger transforms from a weird-looking piece of rubber into a knight in shining armor. This guide will explain exactly what a toilet plunger is, why it’s non-negotiable for your home, and how to use it like a pro.
What Exactly Is a Toilet Plunger?
A toilet plunger is a manual plumbing tool. Its sole job is to clear obstructions from your toilet’s trap and drainpipe. It uses a simple principle: suction and pressure. The classic design has two main parts.
Visual guide about What Is a Toilet Plunger and Why You Need One Right Now
Image source: thespruce.com
The first part is the handle. This is usually a wooden or plastic stick. It gives you the leverage and reach you need. The second, more important part is the rubber cup. This is the business end. On a true toilet plunger, this cup has an extra soft rubber extension. It is called a flange.
This flange is the key. You fold it out when plunging a toilet. It fits neatly into the toilet’s drain hole. This creates a tight, powerful seal. Without this seal, you’re just sloshing dirty water around. You are not creating the pressurized push-pull force needed to break up the clog.
The Science of the Plunge
It’s not magic; it’s physics. When you push the plunger down, you force air and water into the drain. The pressure builds up against the blockage. When you pull up, you create a vacuum. This suction can help loosen the clog’s grip. This repeated push-pull action, called hydraulic pressure, works the clog free. It moves it down the pipe where there’s more room.
Why You Absolutely Need a Toilet Plunger Right Now
Think you can do without one? Let’s be real. Here’s why buying a plunger today is smarter than hoping you’ll never need one.

Visual guide about What Is a Toilet Plunger and Why You Need One Right Now
Image source: pumptoilet.com
- Toilet Clogs Are Inevitable: Too much toilet paper, “flushable” wipes (which aren’t really flushable), or kids’ toys can block any toilet. It happens to everyone.
- It’s Your First and Fastest Solution: A plunger can solve 90% of common clogs in under a minute. Why wait hours for a plumber and pay a huge emergency fee for a simple fix?
- It Prevents Major Disasters: A quick response with a plunger stops an overflow. An overflow can mean ruined floors, ceilings, and thousands in water damage.
- Peace of Mind: Simply knowing it’s there reduces stress. It’s a small investment for a huge amount of household security.
Types of Toilet Plungers: Choosing Your Champion
Not all plungers are created equal. Using the wrong type makes the job harder. Here are the main kinds you’ll see.
Visual guide about What Is a Toilet Plunger and Why You Need One Right Now
Image source: pvcguy.com
The Classic Flange Plunger
This is the standard. It’s the one with the soft rubber flap (flange) inside the main cup. It’s designed specifically for toilets. The flange folds out for toilet use. It can fold in to work like a cup plunger on flat surfaces in a pinch. This is the most common and recommended type for most homes.
The Accordion Plunger
Made of hard plastic in a bellows shape. It looks like an accordion, hence the name. It can move a tremendous amount of water and air with one plunge. It creates very strong pressure. But, it can be messy if you’re not careful. It’s also harder to store and clean.
The Ball-and-Cup or Taze Plunger
This one has a unique design. It features a large, ball-like rubber cup with a funnel inside it. The idea is to force water with more direct pressure into the drain. It can be very effective. Some find it easier to create a seal with this model.
Pro Tip: For 99% of people, a high-quality, sturdy flange plunger is the best choice. It’s versatile, effective, and easy to store.
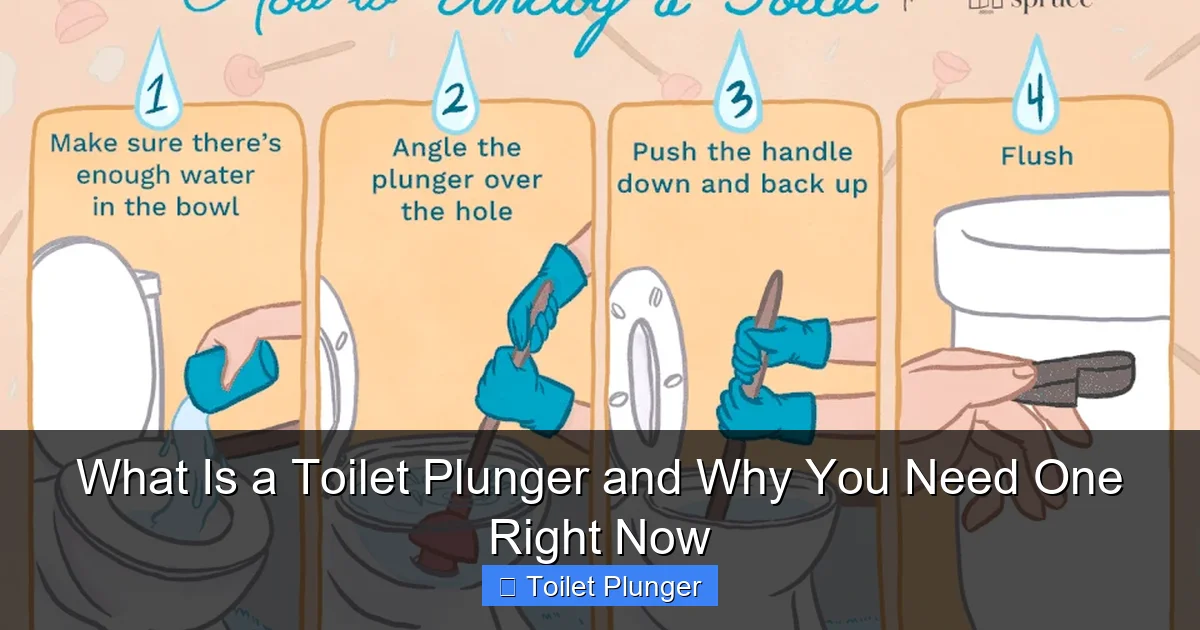
How to Use a Toilet Plunger Correctly: A Step-by-Step Guide
Using a plunger isn’t just about jabbing wildly. Good technique is the difference between success and a bigger mess.
Step 1: Prepare the Area
Put on some rubber gloves. Lay old towels or newspaper on the floor around the toilet. Have a bucket or small wastebasket ready. If the water level is very high, carefully scoop some out into the bucket. You need enough water to cover the plunger’s cup for a good seal.
Step 2: Position the Plunger
Insert the plunger into the bowl. Make sure the flange (if using a flange plunger) is extended. Angle it so the cup covers the drain hole completely. The plunger should be submerged in water. If not, add a little water from the sink. The seal is everything. The cup must be flat against the bottom of the bowl.
Step 3: Execute the Plunge
With a firm grip, push the handle down slowly at first. Let the air escape from the cup. Then, pull up slightly to create a seal. Once sealed, use strong, deliberate thrusts. Push and pull about 10-15 times. Keep the seal tight. The motion should be more vertical than side-to-side. You want to push pressure through the clog.
Step 4: Test and Repeat
After a good series of plunges, yank the plunger up quickly to break the seal. Watch the water. If it drains away quickly, you’ve succeeded! Flush the toilet to make sure it’s clear. If it’s still slow or blocked, repeat the plunging process 2-3 more times.
Step 5: Clean Up
Once the clog is clear, flush the toilet. Carefully rinse the plunger in the clean flush water. Then, take it to a utility sink or bathtub. Clean it with hot water and a little bleach or disinfectant. Let it drip-dry before storing. Clean the area around the toilet with disinfectant.
Troubleshooting: When the Plunger Isn’t Enough
Sometimes, a clog is too tough. If you’ve plunged vigorously multiple times and nothing changes, don’t panic.
- Check for a Full Seal: Did you lose the seal during plunging? Start over, ensuring the cup is fully covered and pressed flat.
- Try a Different Angle: Sometimes, rocking the plunger gently while thrusting can help dislodge a stubborn clog.
- Upgrade Your Tool: If you have a cheap, thin plunger, it might not create enough pressure. Investing in a heavier-duty model can make all the difference.
- Time for a Toilet Auger: If plunging fails, the next tool is a toilet auger (or closet auger). This is a long, flexible cable you feed into the drain to hook or break up the clog. Every advanced DIY household should have one next to the plunger.
If the auger doesn’t work, or if you have frequent clogs, it’s time to call a professional plumber. There may be a deeper issue in your main sewer line.
How to Store and Care for Your Toilet Plunger
Don’t just leave a dirty plunger sitting in a corner. That spreads germs. Here’s how to be hygienic.
After cleaning it, let it dry completely. Store it in a dedicated holder or a sturdy, covered bucket. You can buy plunger caddies that hold both the plunger and a toilet brush neatly. This keeps it off the floor and contains any drips. A well-cared-for plunger can last for years.
Conclusion: Your Household’s First Responder
A toilet plunger is more than just a tool. It’s a symbol of preparedness. It’s the difference between a minor, 30-second hiccup and a full-blown household emergency. By understanding what it is, choosing the right one, and learning the proper technique, you empower yourself to handle one of the most common home problems with confidence.
Don’t wait for the water to rise. Go buy a good, sturdy flange plunger today. Tuck it away behind your toilet. You’ll likely forget it’s there—until that one day you need it. And on that day, you’ll be profoundly grateful you have it. It’s a small price to pay for peace of mind and a functioning bathroom.