How to store a broom smart space saving storage ideas is your complete guide to keeping brooms neat, clean, and out of the way. You will learn where to store a broom, how to hang it, and how to use walls, doors, and corners to save space. Use these simple tips to organize your cleaning tools, protect your broom, and keep your home clutter-free.
Contents
- 1 Key Takeaways
- 2 Introduction: Why Smart Broom Storage Matters
- 3 Step 1: Prepare Your Broom Before Storing It
- 4 Step 2: Choose the Best Location to Store a Broom
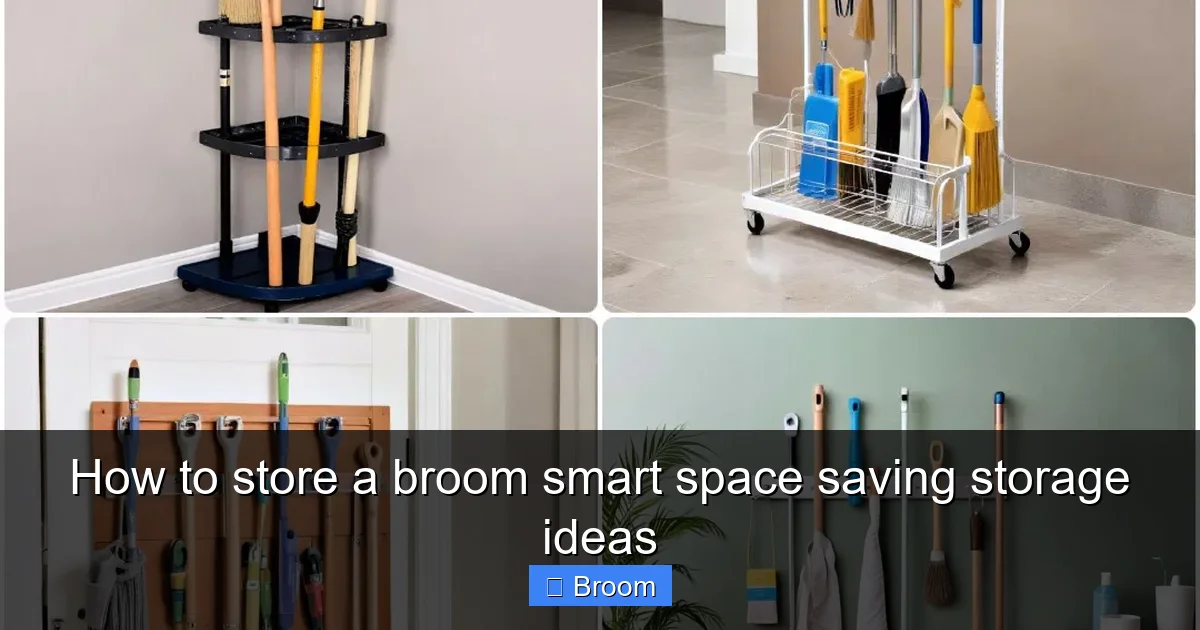
- 5 Step 3: Use Vertical Space – Wall-Mounted Broom Storage
- 6 Step 4: Use Doors for Hidden, Space-Saving Broom Storage
- 7 Step 5: Corner Storage – When You Have Almost No Space
- 8 Step 6: Protect the Bristles – How to Store a Broom Properly
- 9 Step 7: Create a Dedicated Cleaning Station
- 10 Step 8: Special Tips for Small Apartments and Tiny Homes
- 11 Troubleshooting: Common Broom Storage Problems
- 12 Maintenance: Keep Your Broom and Storage Area in Shape
- 13 Conclusion: Store a Broom the Smart, Space-Saving Way
- 14 Author
Key Takeaways
- Point 1: Always store a broom with the bristles off the floor to keep them straight and extend its life.
- Point 2: Use walls, doors, and the back of cabinets for smart, space-saving broom storage.
- Point 3: Group your broom with other cleaning tools to create a simple, organized cleaning station.
- Point 4: Choose the right storage method for your space, whether it is a small apartment, garage, or utility closet.
- Point 5: Keep brooms dry and clean before storing to avoid odors, mold, and damaged bristles.
- Point 6: Cheap DIY options like hooks, tension rods, and hanging organizers work as well as fancy systems.
- Point 7: Regularly check and declutter your broom storage area to keep it safe, tidy, and easy to use.
Introduction: Why Smart Broom Storage Matters
A broom is one of the simplest cleaning tools in your home, yet it often ends up in the most awkward places. It falls over in the corner. It gets stepped on. The bristles bend and wear out too fast. Learning how to store a broom the right way will solve all these problems.
In this guide, you will learn how to store a broom with smart, space saving storage ideas that work in any home. We will cover wall storage, door storage, small-space tricks, and simple DIY solutions. You will also learn how to protect your broom, keep it clean, and make it easy to grab when you need it.
By the end, you will know exactly how to store a broom so it takes up less space, lasts longer, and looks neat instead of messy.
Step 1: Prepare Your Broom Before Storing It
Before you think about where or how to store a broom, you should make sure the broom itself is ready for storage. A dirty or wet broom will not stay in good shape, no matter how smart your storage system is.
Visual guide about How to store a broom smart space saving storage ideas
Image source: images.suite101.com
Clean the Bristles
Always clean your broom before you store it. This keeps dust, hair, and crumbs from spreading in your storage area. It also helps your broom last longer.
- Take the broom outside or over a trash can.
- Tap the broom gently to shake off loose dirt.
- Use your hand or a comb to pull out hair and threads from the bristles.
- For a deeper clean, rinse the bristles in warm, soapy water and swish them around.
If you rinse the broom, rinse again with clean water to remove soap. This is especially useful for kitchen brooms that pick up sticky crumbs or grease.
Dry the Broom Completely
Never store a broom with wet bristles. Moisture can cause mold, bad smells, and warped bristles. It can also damage wooden handles.
- Shake off excess water after rinsing.
- Place the broom outside or in a well-ventilated area to air dry.
- Hang the broom upside down or lay it flat so the bristles can dry evenly.
Once the broom is fully dry, you are ready to choose the best way to store a broom in your home.
Step 2: Choose the Best Location to Store a Broom
To store a broom smartly, you first need the right location. The best spot is easy to reach, dry, and out of the way. Think about where you actually use your broom most often.

Visual guide about How to store a broom smart space saving storage ideas
Image source: images.suite101.com
Common Places to Store a Broom
- Utility or broom closet: Ideal if you have one. You can hang the broom on the wall or door inside.
- Kitchen pantry: Great if you sweep the kitchen daily. Use the side wall or back of the pantry door.
- Laundry room: Often has extra wall space for a broom and other cleaning tools.
- Garage: Works well if it is dry and not too dusty or damp.
- Hallway or entry closet: Use the inside wall for hanging storage.
What to Avoid When You Store a Broom
- Do not store a broom in damp basements without ventilation.
- Do not lean it in a place where it will be knocked over often.
- Do not store it with the bristles pressed against heavy objects.
- Do not place it where pets or children will chew or pull on it.
When you plan how to store a broom, think about both protection and convenience. You want it safe, but you also want to reach it quickly when there is a spill.
Step 3: Use Vertical Space – Wall-Mounted Broom Storage
One of the smartest ways to store a broom is to use vertical space. Walls are often underused. A wall-mounted system keeps your broom off the floor and saves a lot of space.
Install a Broom Holder or Rack
A broom holder is a simple strip with clips or hooks that grab the handle. It is designed to store a broom and other tools like mops, dusters, and dustpans.
- Choose a holder with enough slots for all your cleaning tools.
- Mount it at a height where you can easily hang and remove the broom.
- Use wall anchors if you are not drilling into a stud.
- Place it on an open wall in a closet, garage, or laundry room.
This is one of the best space saving storage ideas, because the broom hangs flat against the wall and leaves the floor clear.
Use Simple Hooks for Budget Storage
If you do not want to buy a full rack, you can still store a broom neatly with basic hooks.
- Use heavy-duty adhesive hooks if you cannot drill into the wall.
- Use screw-in hooks for a stronger hold, especially for heavier brooms.
- Attach the hook at the top of the handle or through the hanging hole if your broom has one.
This is a cheap and flexible way to store a broom in small spaces like apartments or rented homes where you need removable solutions.
Organize Multiple Brooms and Tools
When you use the wall to store a broom, you can also hang other tools beside it. This creates a simple cleaning station.
- Hang the broom, mop, dustpan, and duster in a row.
- Keep the most used tools at the center and at a comfortable height.
- Store less-used items higher up or at the ends.
This layout makes cleaning faster because everything is in one place. It also keeps your floor looking clear and tidy.
Step 4: Use Doors for Hidden, Space-Saving Broom Storage
If you have very little wall space, you can store a broom on the back of a door. This is perfect for small homes and apartments.
Over-the-Door Organizers
Over-the-door organizers come in many styles. Some have pockets, some have hooks, and some have clips for long handles. They let you store a broom without drilling holes.
- Choose an organizer that fits your door thickness.
- Hang it over a closet, pantry, or laundry room door.
- Use the long slots or hooks to hold broom handles.
- Use pockets for smaller items like cleaning cloths, gloves, and sprays.
This is a smart way to store a broom out of sight while also using every inch of space.
Hooks on the Back of the Door
You can also add single hooks directly to the back of a door to store a broom.
- Use adhesive hooks if you do not want to damage the door.
- Space the hooks so the broom hangs straight and does not drag on the floor.
- Make sure the broom does not block the door from closing.
This method is simple and works well in rental homes, dorm rooms, or any small space where you need to store a broom in a hidden spot.
Step 5: Corner Storage – When You Have Almost No Space
Corners are often wasted space, but they are great for broom storage. If you plan it well, you can store a broom in a corner without it falling over or looking messy.
Use a Corner Broom Stand
A corner stand is a small rack that sits on the floor and holds the handles of your broom and mop. Some have slots or hooks to keep tools upright.
- Place the stand in a corner of a laundry room, garage, or utility closet.
- Slide the broom handle into one of the slots.
- Add your mop, duster, and even a small vacuum if the stand allows.
This lets you store a broom in a tight corner while still keeping it organized and easy to grab.
DIY Corner Storage with Tension Rods
You can create your own corner storage system using tension rods or a short pole.
- Place a tension rod horizontally between two walls inside a closet.
- Hang S-hooks on the rod.
- Use the hooks to hold the broom handle.
This is a low-cost, no-drill way to store a broom in a narrow closet or small alcove.
Step 6: Protect the Bristles – How to Store a Broom Properly
The way you position the broom matters as much as where you put it. To store a broom correctly, you must protect the bristles.
Always Store a Broom with Bristles Off the Floor
If you leave a broom standing on its bristles, they will bend, spread, and wear out quickly. This makes sweeping harder and less effective.
- Hang the broom by its handle from a hook or rack.
- Or store it upside down, with the handle on the floor and bristles in the air.
- If you must lean it, lean it gently so the bristles do not carry the full weight.
This simple habit will greatly extend the life of your broom.
Use a Broom Cover or Bag
If your broom sits in a dusty garage or open area, consider a cover.
- Use a fabric bag, old pillowcase, or purpose-made broom cover.
- Slip it over the bristles when you store a broom.
- Secure it loosely with a tie or elastic band.
This keeps dust and spider webs off the bristles and makes your broom feel cleaner every time you use it.
Step 7: Create a Dedicated Cleaning Station
One of the smartest space saving storage ideas is to keep all your cleaning tools in one place. Instead of shoving your broom in random corners, build a small cleaning station.
Plan Your Cleaning Station
Choose a small area where you can store a broom, mop, dustpan, and cleaning supplies together.
- Use a closet, pantry corner, or section of the garage.
- Mount a broom holder on the wall for long-handled tools.
- Add shelves or a small cart for sprays, cloths, and cleaners.
- Hang a dustpan on a hook next to the broom.
Now, every time you clean, you know exactly where everything is.
Label and Group Items
If you live with family or roommates, labels help everyone know how to store a broom and other tools correctly.
- Use labels above hooks: “Broom”, “Mop”, “Duster”.
- Group floor-cleaning tools together.
- Keep bathroom cleaners in a separate bin if needed.
This reduces clutter and stops people from tossing the broom in the nearest corner.
Step 8: Special Tips for Small Apartments and Tiny Homes
In a small apartment, every inch counts. You need smart, compact ways to store a broom without giving up valuable space.
Store a Broom Behind Furniture
Sometimes the best place to store a broom is behind large furniture pieces.
- Slide a broom behind the fridge if there is a narrow gap.
- Use the space between a cabinet and the wall.
- Place a hook on the side of a tall cabinet or wardrobe.
Make sure the broom is still easy to pull out and does not scratch surfaces.
Use Multi-Function Furniture
Look for furniture that doubles as storage for cleaning tools.
- Entry benches with tall side cabinets can hide a broom.
- Closets with built-in broom holders on the side wall are very efficient.
- Utility carts can hold a broom on the side using clip-on hooks.
This way, you store a broom without needing a separate closet.
Collapsible and Compact Brooms
If space is truly tight, consider a broom designed for small spaces.
- Choose a broom with a telescoping or detachable handle.
- Pick a broom-and-dustpan set that snaps together and stands upright.
- Store it in a narrow gap, under the sink, or inside a cabinet door.
These tools are made to store a broom in the smallest possible footprint.
Troubleshooting: Common Broom Storage Problems
Problem 1: The Broom Keeps Falling Over
If your broom falls over all the time, it is not stored securely.
- Switch from leaning it in a corner to hanging it on a hook or rack.
- If you must lean it, place it in a tight corner where it cannot slide.
- Use a corner stand to keep multiple tools upright.
Problem 2: The Bristles Are Bent or Flared
Bent bristles often happen when you store a broom on its bristles.
- Start storing the broom with bristles off the floor.
- Soak the bristles briefly in warm water, then reshape and let them dry straight.
- If the broom is very worn, it may be time to replace it.
Problem 3: The Broom Smells Musty
A musty smell means the broom was stored wet or in a damp place.
- Wash the bristles with warm, soapy water and a bit of vinegar.
- Let the broom dry fully in the sun or a dry, airy spot.
- Store a broom in a dry area away from moisture sources.
Problem 4: No Closet or Wall Space
If you have no closet or usable wall space, you can still store a broom smartly.
- Use the back of a door with an over-the-door organizer.
- Slide a broom into a narrow gap between appliances or cabinets.
- Use a slim corner stand in the bathroom, kitchen, or hallway.
Maintenance: Keep Your Broom and Storage Area in Shape
Once you know how to store a broom properly, a little maintenance will keep everything in good order.
Regular Broom Care
- Clean the bristles at least once a month, or more often in busy homes.
- Check the handle for cracks or splinters.
- Tighten any loose screws or detachable handles.
Clean and Declutter the Storage Area
- Wipe down hooks, racks, and shelves every few months.
- Remove tools you no longer use to free up space.
- Check for moisture, leaks, or pests in closets and garages.
Good maintenance makes it easier to store a broom and keeps your home cleaner overall.
Conclusion: Store a Broom the Smart, Space-Saving Way
Learning how to store a broom is a small step that makes a big difference in your home. When you use smart, space saving storage ideas, your broom lasts longer, your closets stay neat, and cleaning feels easier.
Remember the basics: clean and dry your broom before storing, keep the bristles off the floor, and use your walls, doors, and corners wisely. Whether you live in a big house or a tiny apartment, you can store a broom in a way that is tidy, efficient, and simple to maintain. Choose one or two ideas from this guide and set up your broom storage today.
🎥 Related Video: Let’s organize the cleaning closet 🧹🤍 #organizedhome #homeorganization #amazonfinds #amazon
📺 Teresa Laura